For a while, I have been considering building a website to document things I learn. This year I decided to stop procsanating and get started with it.
Introducing patelhiren.com in all its glory. 🎉
Goals
For this site I had a few basic goals in mind.
- It should serve as a log to help me remember and reivew how I did things. I hope that others may find it helpful as well.
- The website should be fast and light. Should not be overburdened with Javascript.
- Should be able to host website with a simple webserver. No server side software should be necessary.
- Allowed me to keep my content in a standard text + image format for easy parsing even when not viewing via a browser. I did not want my content to be stored in binary formats in a database. I want it to be stored in plain text files on the filesystem.
- Support code syntax highlighting.
- Support SSL encryption on the website.
- Support emoji.
The above goals meant I was going to be building a Static Site using one of the many Static Site Generator Tools
Tools
After deciding I wanted a static site, I researched the various Static Site Generator Tools and settled on Hugo as my choice.
Hugo written in Go, is highly reviewed and praised for its speed of site generation. It supports macOS (my primary OS of choice), Windows, Linux, OpenBSD and FreeBSD. It has a very well documented site and looks to have an active community developing and supporting it. It allows me to create my content in Markdown syntax thus allowing me to keep it in plain text on the filesystem. It also supports code syntax highlighting and emoji 👌. You can check details of Hugo’s Makrdown support at markdownguide.org
Hugo supports a variety of Themes. I settled on Notepadium because it provided most of what I wanted out of box. I plan to customize it a bit to my liking as I learn more.
Hosting
For hosting I decided to use GitHub Pages. GitHub Pages is free, supports SSL and provides automatic CDN for serving fast webpages closer to your user. It also had the added benefit of having my generated site auotmatically have commit history and remote backup.
Installing Hugo and Building your site
I use macOS as my primary OS so these steps are for for the Mac. However the steps should be very similar if you are using any other supported OS. Homebrew and git 1 is expected to be installed before you follow the rest of the steps.
Install Hugo
|
|
To verify the install run
|
|
Create your new site
|
|
Add the Notepadium Theme
|
|
Activate the theme for your site by adding it to the config.toml
|
|
Create a new post 2
|
|
You can find your content under content folder. You can open the newly created index.md file in any Markdown editor of choice 3 and edit and save your content. Here is an example post to suggest what’s possible.
|
|
Once you save your content you can test it locally by activating Hugo local web server.
|
|
You can navigate to your local site at http://localhost:1313/.
Edit you config.toml to configure the rest of your site settings. Here is mine.
|
|
To build your static site run:
|
|
The output will be saved under ./public/ directory. You may copy the contents of this folder to any webserver and your website will be servered.
Hosting your site on GitHub Pages
- Create a repository to hold your Hugo content and source files on GitHub. Mine is called patelhiren.com
- Create a repository called <username>.github.io. Replace <username> with your GitHub username. Mine is called patelhiren.github.io.
- Clone your source project via:
|
|
-
Paste your existing source files in the new repository folder.
-
Run and verify your local Hugo files from local repo by running
hugo server -Dand accessing the site at http://localhost:1313/. -
Once you are happy with the results:
- Press Ctrl+C to kill the server
- Before proceeding completely remove the public directory
-
Add your public site as a git submodule. Like so:
|
|
Automating the deployment process
Create a new file deploy.sh and set its contents to below script. This will allow you to run deploy.sh to build your site and deploy to GitHub in one go.
|
|
- Your site will then be available at
https://<username>.github.io.
Customizing GitHub pages to use a custom domain
If you plan to use your own doamin instead of the <username>.github.io you need to follow the guide at Managing a custom domain for your GitHub Pages site.
For my site I did the following:
- Create a file called
CNAMEand set its contents to patelhiren.com. - Added the
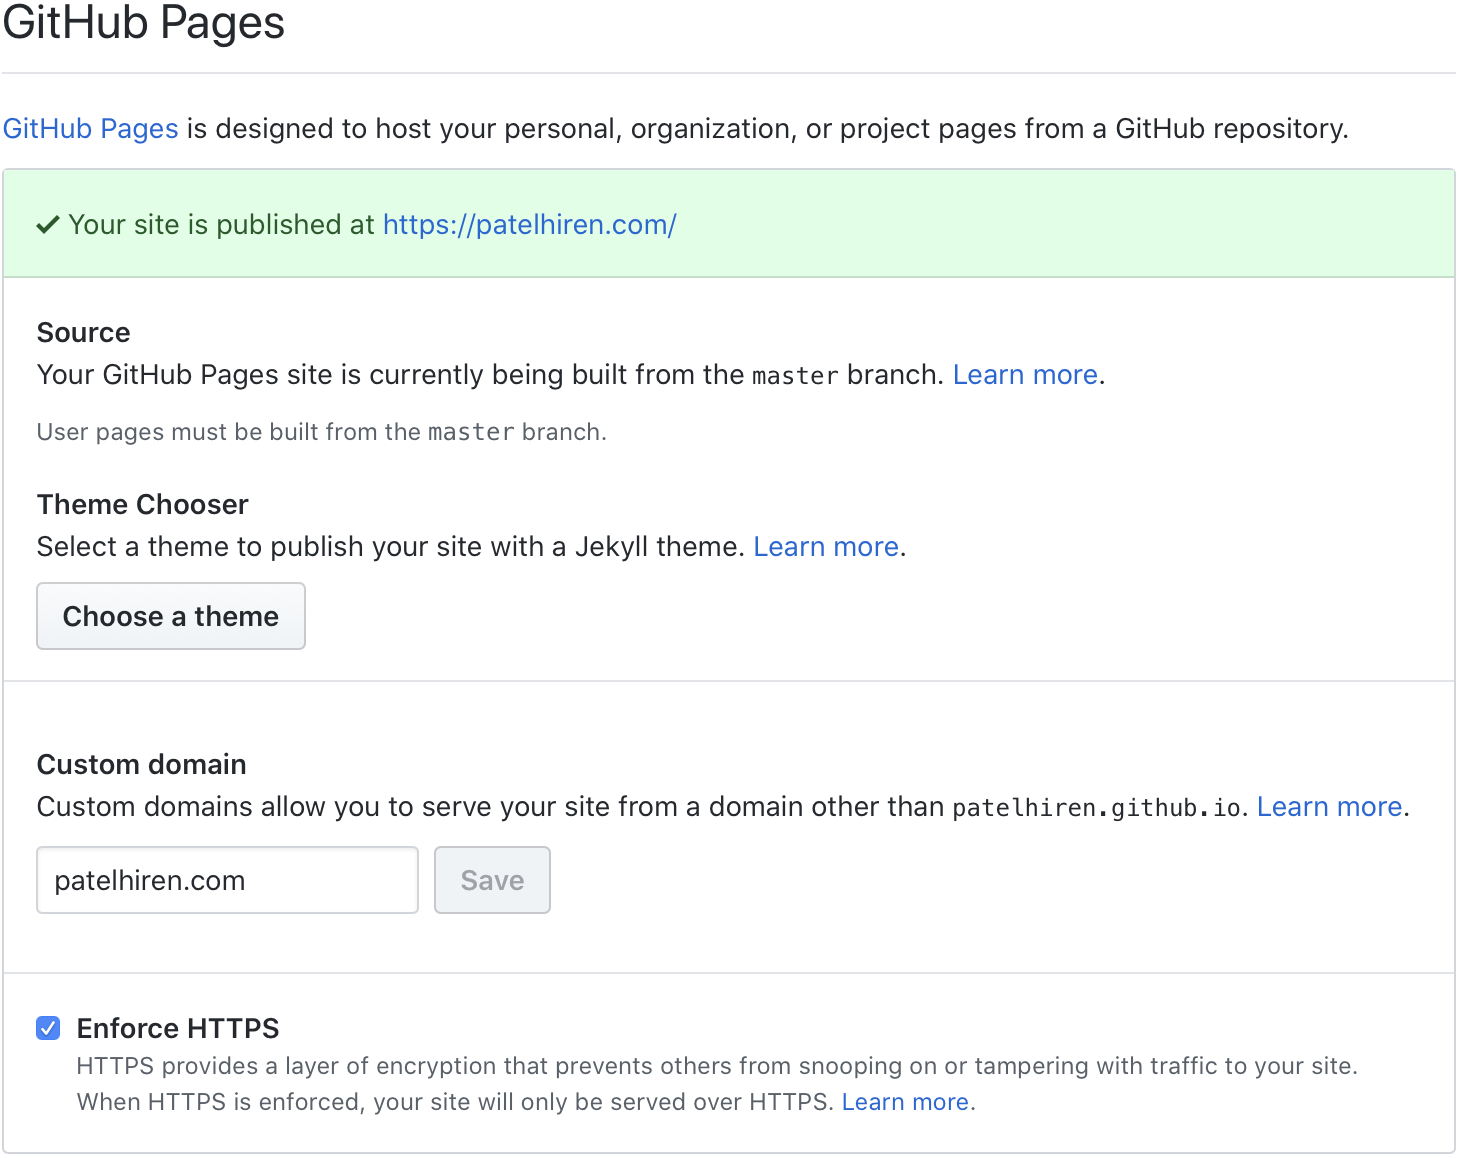
CNAMEfile to the git repo at patelhiren.github.io. - Got to Repo Settings at https://github.com/patelhiren/patelhiren.github.io/settings and set Custom domain and Enforce HTTPS settings.
Publishing new Post/Changes
To publish a new post:
- Create a new post similar to to command below.
|
|
-
Set and edit your post using Markdown tools.
-
Run and verify your local Hugo files from local repo by running
hugo server -Dand accessing the site at http://localhost:1313/. -
Run
deploy.shto deploy your site. -
Commit your changes to your source repo.
Conclusion
This is all that should be necessary. It looks like a lot of steps, but in practice it is very simple and doesn’t require as much work to maintain for publishing new posts.
-
Creating a blog post this way with a folder as the post name allows you to keep images within the same folder instead of keeping images in the root folder. This felt like better grouping of content vs the default Hugo suggested way of generating new post via hugo new blog/my-first-post. ↩︎
-
I prefer Visual Studio Code. Tip: If using Visual Studio Code you can press CMD+K,V to activate side-by-side live preview of the Markdown you are typing. ↩︎