The Foscam Floodlight Camera is competitively prized and has decent features including option to record 24/7 video locally to a micro sdcard without the need for a cloud subscription. It however does not support integration with HomeKit my preferred home automation platform. Here is how I setup the floodlight in HomeKit.
Download and install the Foscam VMS app from the Mac App Store. Signup and Signin to the Foscam Account.
We will also need the Foscam iOS app.
We need both macOS and iOS apps because unfortunately certain settings are only available in the macOS app where others are only available in the iOS app.
Foscam VMS (macOS) App Settings
Once the camera is setup and available in the Foscam VMS app, goto the the camera settings by clicking the settings icon next to the camera name.
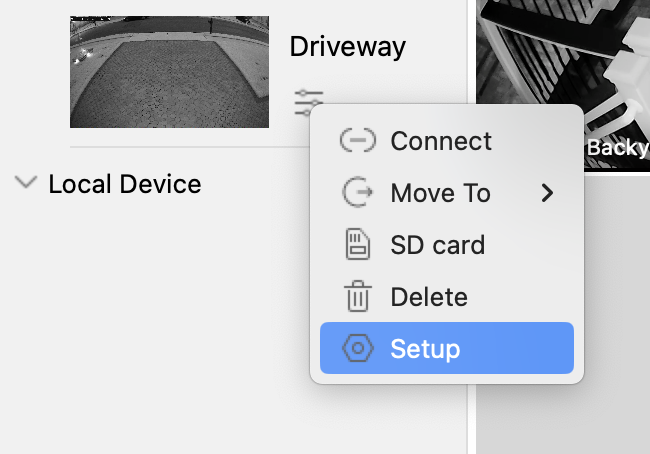
Set the settings like so:
Basic Settings
- Set Device name and Device time.
- Disable Voice prompt.
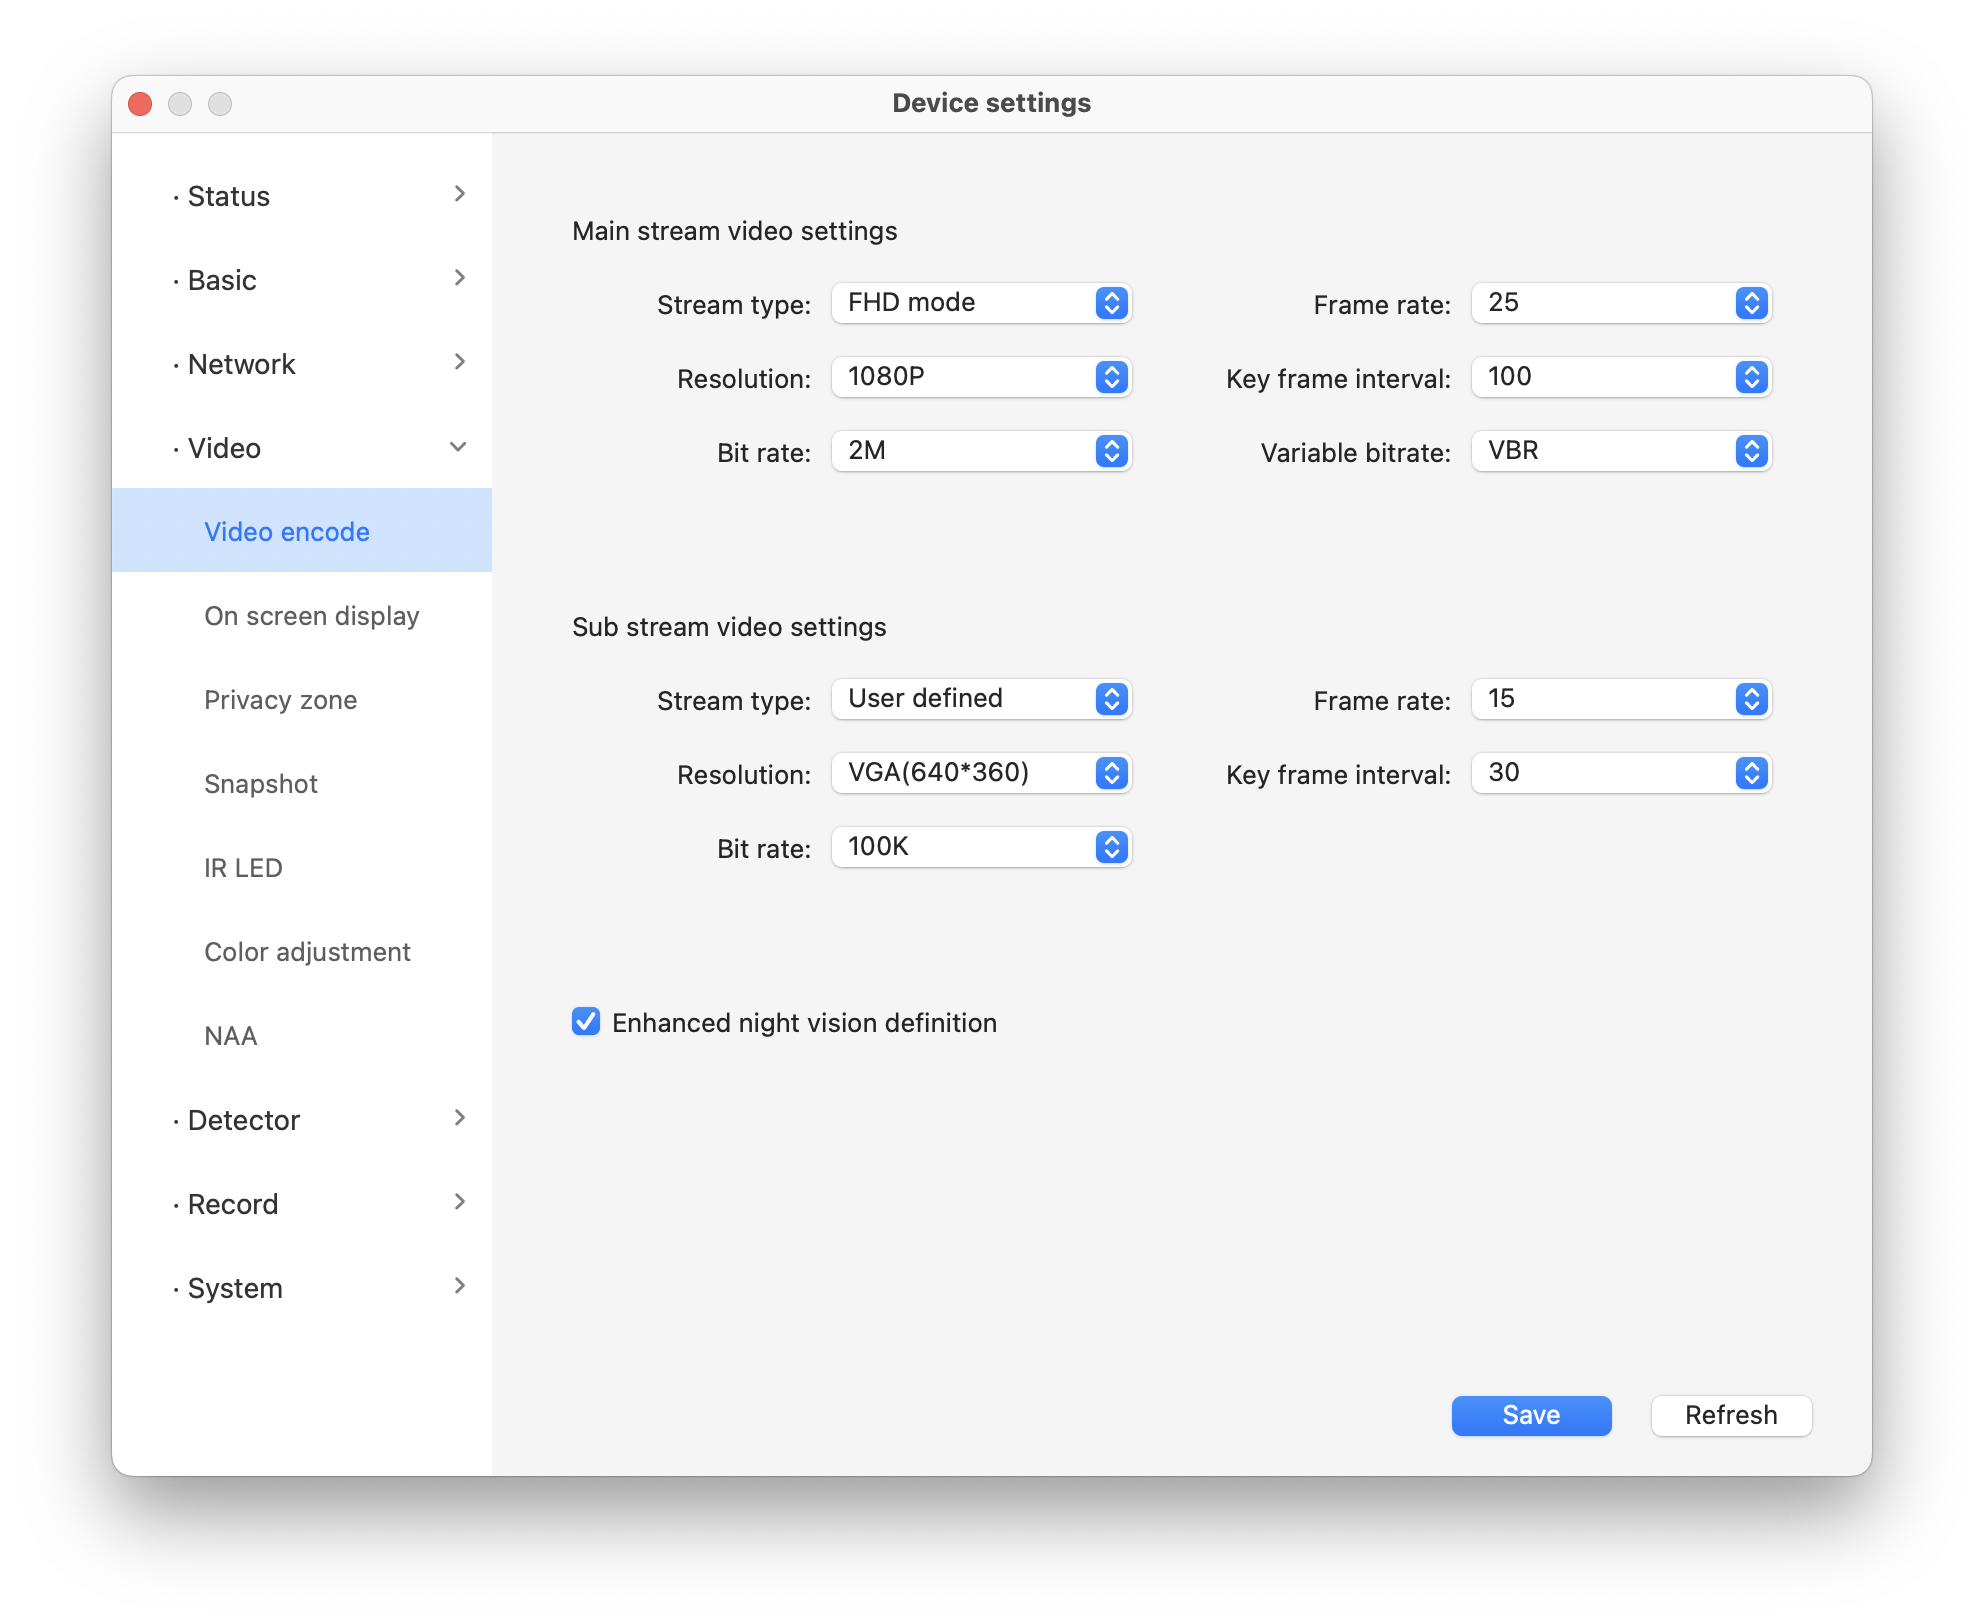
Video Settings
- Set Video encode settings like below. Set both the Main stream and Sub stream settings like the one in the screenshot. You may choose to use QHD stream type if you prefer 2K resolution, however I found the response time to be slower in HomeKit with that.
- Set On screen display -> Display timestamp to Yes.
- Set Privacy zone -> Privacy zone to Yes.
We are going to be using the Privacy zone to make the On screen time display readable. You can drag the privacy zone around the time area, but I found the drag operation to be very hard due to responsiveness issues. We will instead use Foscam CGI Command to set the privacy zone later in the section.
- I found the default colors to be oversaturated so I tweaked the Color adjustment like below.

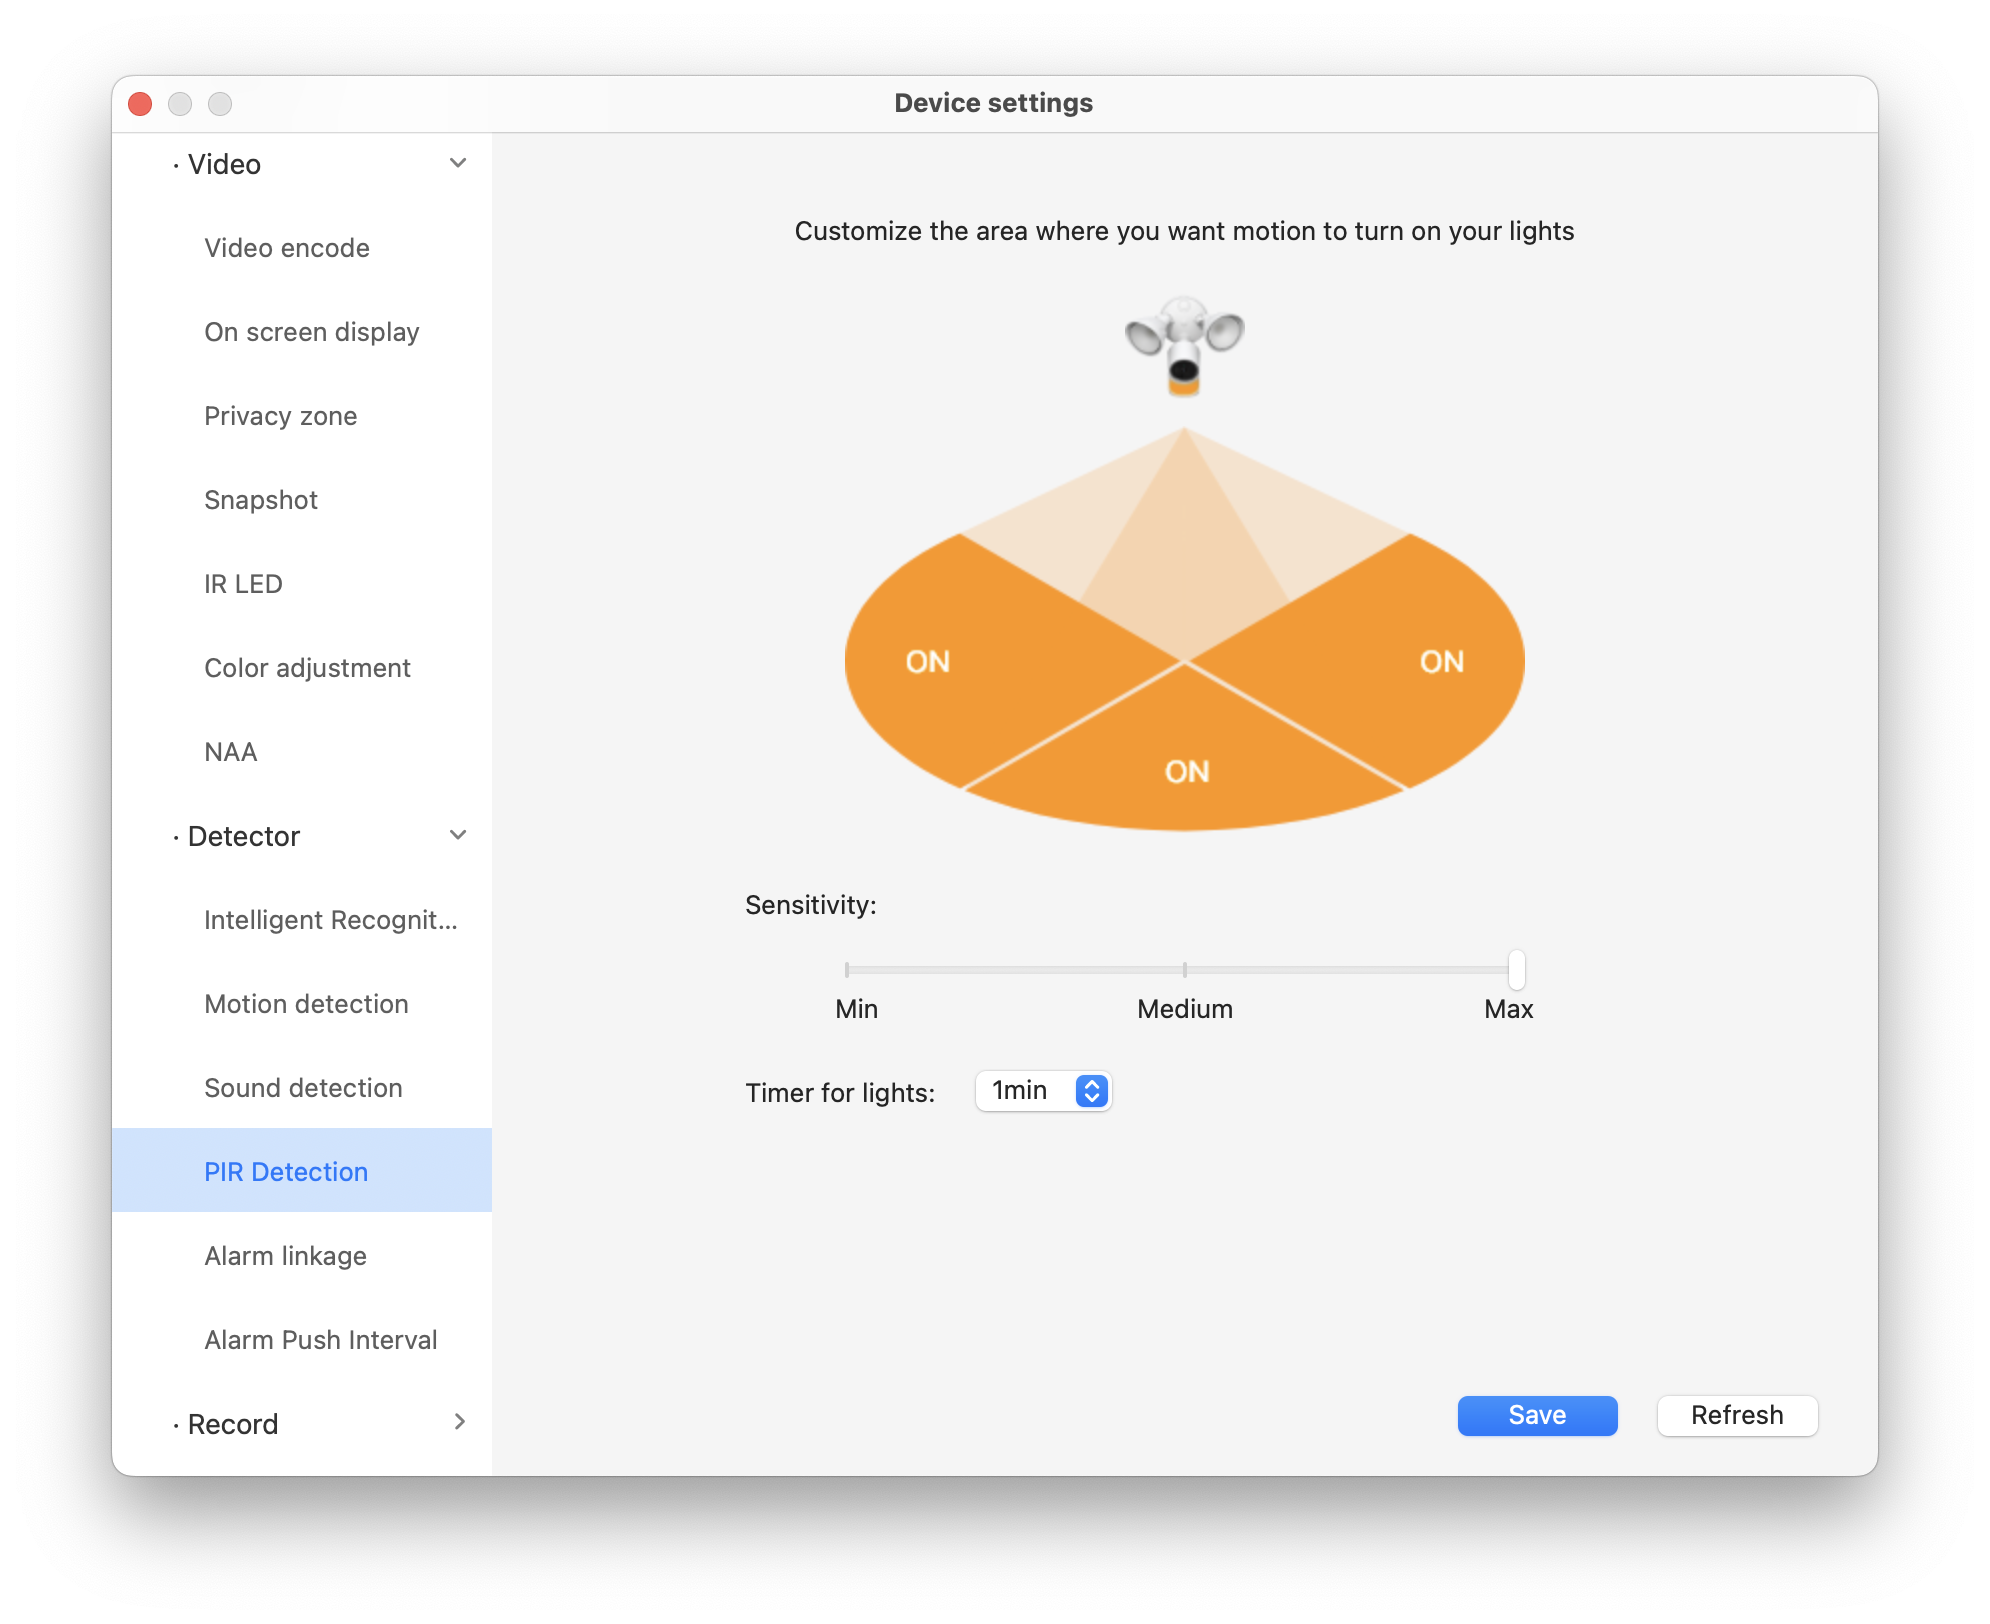
Detector Settings
- I found the camera’s onboard motion detector to be too conservative for my liking so I disabled the Motion Detection & Sound Detection under the Detector settings. The only setting turned on is the PIR Detection.
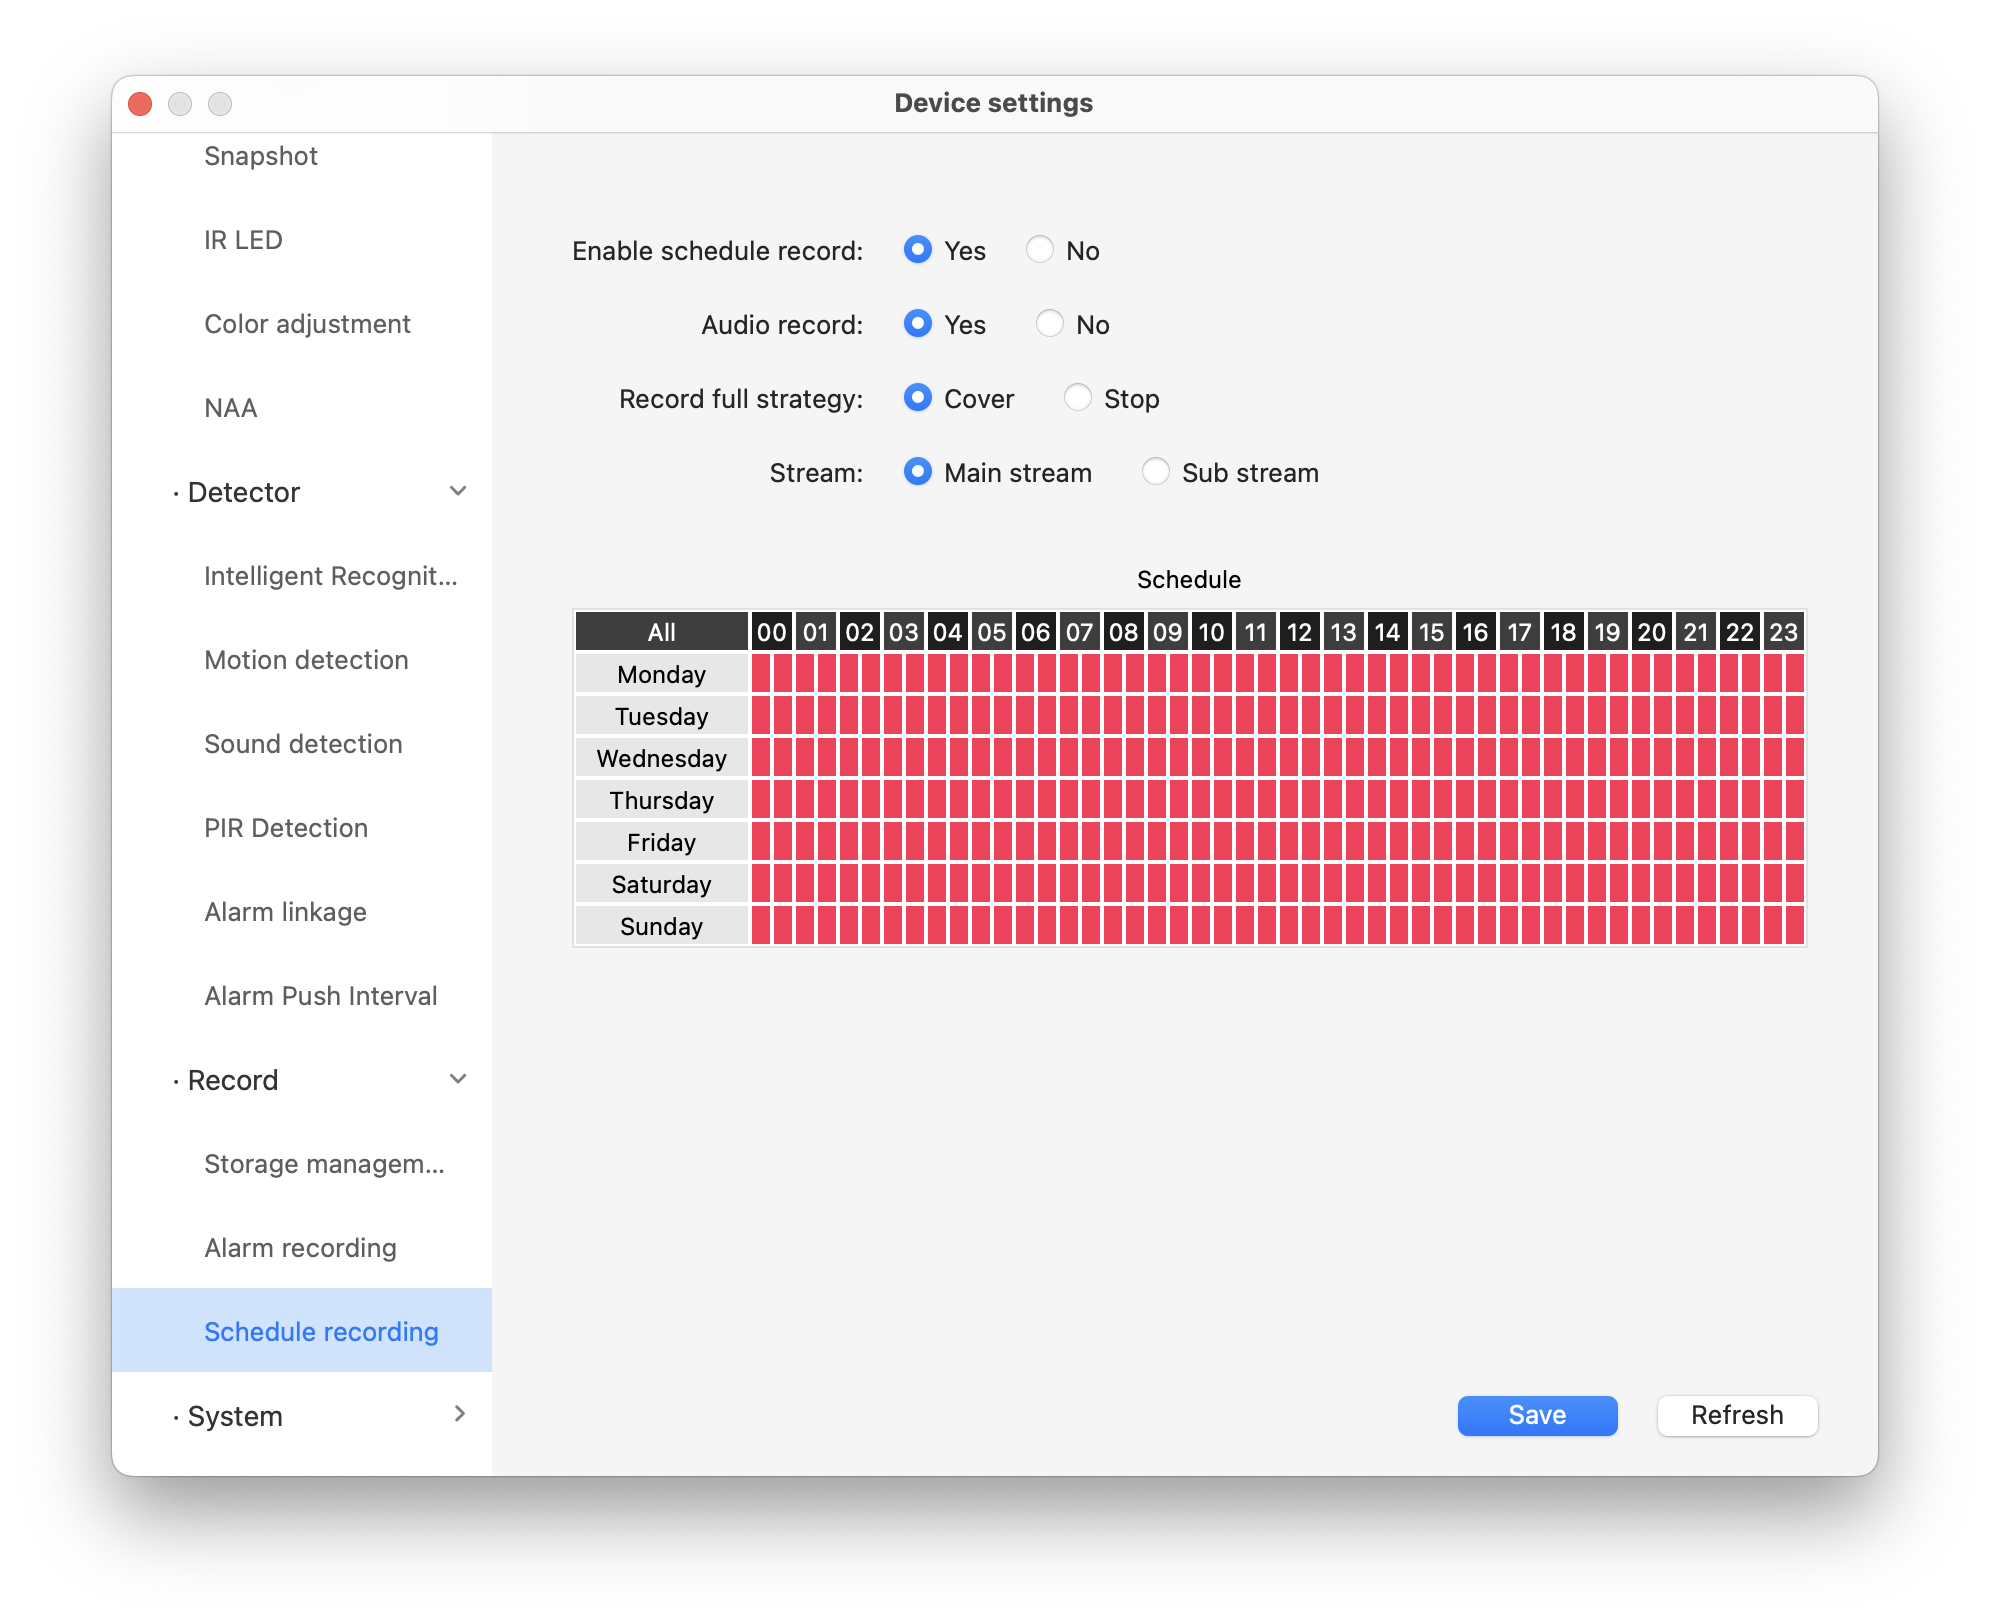
Record Settings
- Enable SD card option under Record.
- Under Schedule Recording I enabled 24/7 Recording including Audio by tapping the All area in the Schedule table.
Save and close the Camera Settings window.
Making the Onscreen Time Readable
By default the onscreen time has not background and so it is overlayed directly on the video. This makes the time in the video hard to read. In order to fix this we use the Privacy zone and setup a rectangle around the time. This way it will alway have a black background behind the time, improving readablity.
Run the below command adjusting values for the camera-ip, camera-user-name, and camera-user-password to setup the privacy rectangle behind time.
|
|

Foscam (iOS) App Settings
- Load the Camera Settings by tapping the … button and tapping Settings.
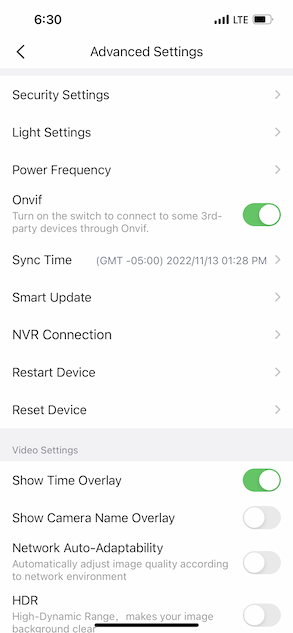
- Select Advanced Settings.
- Automatic firmware updates are on by default. Disable them under Smart Update.
- Enable Onvif
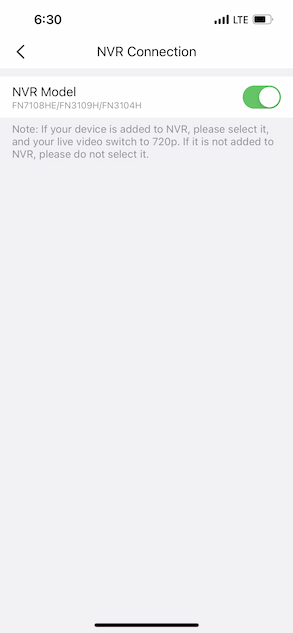
- Under NVR Connection Enable NVR Model
When NVR and ONVIF are enabled, the stream switches to H264 which is required for HomeKit integration. Without that the default stream format is H265 which is incompatible with HomeKit.
Adding the camera to Scrypted
We will be using the excellent Scrypted platform to access this camera from HomeKit and also enable HomeKit Secure Video. I have Scrypted running in a Docker container on a Ubuntu server.
Under Scrypted install the below plugins.
- HomeKit - For exposing camera to HomeKit
- RTSP Camera Plugin - For connecting to Foscam floodlight camera via RTSP stream.
- Open CV Motion Detection - To expose custom motion detection sensing via OpenCV so Home Hub can process motion and record clips to HomeKit Secure Video.
- Dummy Switch Plugin - To control the floodlight via HomeKit.
RTSP Camera Plugin Setup
- Navigate to RTSP Camera Plugin page and click Add Device.
- Enter a name for your camera and click Create
- Under the newly loaded device page in the General tab, click the Add button so you have a place to enter two RTSP Stream URL. Enter the information for
- Username - The camera username
- Password - The camera password
- RTSP Stream URL -
http://<<camera-ip-address>>:88/videoMain - RTSP Stream URL -
http://<<camera-ip-address>>:88/videoSub
- Click Save RTSP Stream URL and the Save button.
- Refresh the Page. This should load the snapshot of the camera and also show additional tabs.
- Switch to the Stream Management tab and change the Low Resolution Stream value to Stream 2.
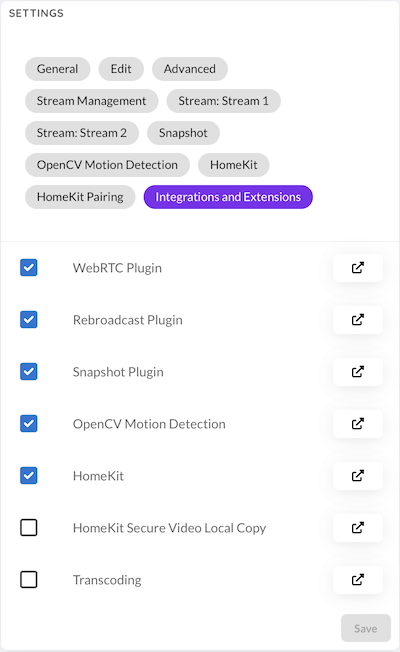
- Switch to the Integrations and Extensions tab and check OpenCV Motion Detection and HomeKit. Refresh the page. The integrations should look like the below screenshot.
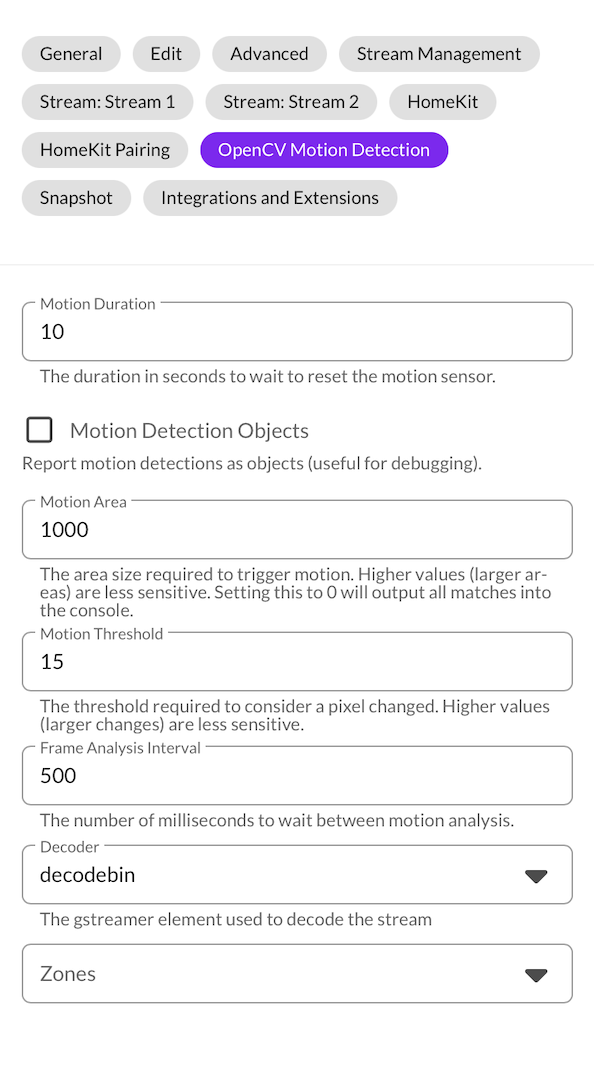
- Switch to the OpenCV Motion Detection tab and set the settings as you wish to tweak. For my setup I only changed the Motion Area to 1000, Motion Threshold to 15, and Frame Analysis Interval to 500.
- Switch to the HomeKit Pairing tab and make sure the Standalone Accessory Mode is checked.
- You may now add the camera to HomeKit. The QR Code to pair with HomeKit will be available under the HomeKit tab of the camera under Scrypted.
Operating the Floodlight
- Install the Foscam Floodlight Plugin from scrypted plugins.
- Select Add Device and enter a name for the Floodlight.
- On the Device page under General Settings set the Foscam IP to the device camera ip. Note the default port for the Camera is 88.
- Set the camera Username and Password and hit Save.
- Enable HomeKit integration, and pair with HomeKit.
- The device will now let you to turn the floodlight on/off and set the brightness.
I also blocked the camera ips from accessing the internet except the NTP port via my firewall. The cameras connect locally to my Home Hub (Apple TV) and then are available to HomeKit everywhere through that. So that is an additional level of privacy I enjoy. Overall this setup is working very well and HomeKit recognizes People/Pets/Vehicles and Packages pretty well and quickly.